Category Archives: Software

“It’s the graphics, stupid”

(this post is actually a sequel to some other ones related to the same topic, namely the Windows 7 and 10 graphics issues in different music software)

Ok, here’s my guess about what actually happened.

1. When HD became the buzzword of computer graphics and Apple released its Metal 3D graphic shader back in 2014, Windows were in a hurry to come up with something similar.

2. However, Windows 8 – having been released two years before Metal –  had not been a success. In fact, it was a mess and an expensive disaster. Therefore there was even bigger a hurry for new operating system shiny enough to encounter Apple products. The result was Windows 10, released more or less prematurely as an unfinished product in 2015.

3. Here’s where different music software vendors come in. They all faced the same question: how do we make our products look better?

4. If you check out my previous posts on Native Instruments plugins and soft synths such as Massive X, they were the first major company to step on this HD landmine. Since most people were still using Windows 7, their new releases didn’t work well on any Windows version. It was all because of the combination of HD graphics, different generations of hardware and lack of proper testing that made so many people to abandon several generations of NI software products. The  whole thing was a painfully revealing proof of the fact that audio software vendors did not have enough people with technical GUI expertise working for them.

5. The next hopeful vendor to face the same problem was Steinberg, which traditionally has had a reputation of putting out sturdy yet groundbreaking products. Well that didn’t work out with Windows 10, as one can see below:


The screenshot in question was taken from Steinberg forums, and it features Cubase 10 running on Windows 10. However I can confirm that the same issue still persists in Cubase 12.

All dropdown menus are completely blank.

6. The reason for this is neither Windows 10 nor Cubase, or any hardware by itself but, rather, the combination of all three. Cubase 12 runs perfectly on Windows 10, but some of its graphics (with transparent effects) will not render correctly depending on for example the OpenGL version running on a particular computer. This is of course dependent on hardware, mainly the graphics processor. On their website, Steinberg lists the actual graphics processors compatible with latest Cubase, but usually they settle for mentioning that “Windows 10 native supported graphics units” can handle Cubase versions 10-12.

7. As one can see browsing through Steinberg forums, some users have had luck with paradoxically lowering the graphics settings of Cubase to make the dropdown menus visible again. However, there’s a downside to this, which is crystallized in the error message below:


8. This very error was what I personally encountered when trying to install Waves Complete 14 plugins to an older computer running on Windows 10. The cause of this error has nothing to do with computer audio but – you guessed it – graphics. On Waves 14, the GUI of some plugins has been updated to be both HD and freely rescalable, and this sort of solution requires graphics processing power.

9. I was however able to make the installation work by basically turning on maximum graphics performance in my old laptop, and all Waves plugins including the new GUI ones now show up fine. There is however a downside to this, as described in the Steinberg forum post below:


10
. The issue masmith516 was dealing with back in 2019 concerned disappearing i.e. blank dropdown menus in Cubase 10. As one can see, he or she lowered the graphics properties of Cubase only to find out that this move actually makes the latest Waves HD plugins to malfunction. Thus some people can run both Cubase and Waves, but not at the same time. Again, none of this has anything to do with audio: it’s all about graphics.

11. As Ableton Live 11 as well as Bitwig Studio 4 both work fine graphics-wise in my older laptop and have no issues with Waves plugins, my final solution was to ditch using Cubase 12 altogether. I don’t want to buy a new computer just to be able to see the dropdown menus of an audio editing program.

12. All in all, just like Steinberg these days, many audio software vendors are in my opinion more about making visually impressive and thus GUI-heavy “entertainment software” instead of practical tools. There are vendors able to combine these two into working products (in my opinion for example Izotope and also Arturia have been successful in this), but all too often the end users have to deal with a plethora of issues related to visual outlook of their audio software. 

Is my operation system supported? Is it the right version of that operation system? Is the graphics processor of a workstation originally aimed at audio recording and editing powerful enough? And why the hell Cubase stops working the very moment Waves plugins start to work, and both things happen for the same exact reason?

It’s the graphics, stupid.

External hardware FX: cases Cubase and Ableton

For natural reasons most blog posts are about their writer’s expertise, and rightfully so. When there is a lesson to be given, someone with adequate level of knowledge is definitely the right person for the job.

Rarely does the writer openly present his or her case from the viewpoint of how stupid the person has been. I will now do exactly that. After all, those lessons are the most memorable and may even save time and trouble would the reader encounter something similar. I will also add the necessary images to clarify my case.

The starting point was the following: I wanted to use my Korg Kaoss Pad 3+ as an external hardware effect in a DAW, but I thought this was not possible.

The reason for this was that using an outboard effect requires its own audio input and output in the audio interface (such as M-Audio, Focusrite, Alesis etc.). My interface is embedded in my mixer, Allen & Heath ZED 10FX, a really sturdy and well-designed device. There is only one pair of stereo input and output for audio routing though, so I had no way of using KP3 as a track FX with just that one pair.

Here’s the rare bright spot in my thinking: I almost bought a new interface with plenty of I/O, but only almost. Instead I took a look at my old interface, the M-Audio Audiophile USB. Like my mixer, it is equipped with one pair of inputs and outputs.

I was absolutely convinced that using two different audio interfaces simultaneously was not possible in a DAW running on Windows 7.

Apparently this is not true.

I got the KP3 working as a track effect in two hours in two DAWs, Cubase and Ableton. The following of course goes for any outboard hardware effect, but for continuity’s sake I will use KP3 as an example.

What I needed was the following:

1. audio interface one with pair of I/O (often called 2×2), in my case Allen & Heath mixer

2. another audio interface with pair of I/O, in my case M-Audio Audiophile USB

3. two stereo RCA audio cables (red-white)

4. usb cable for Audiophile (my mixer was already connected via usb)

5. ASIO4All driver (I had it already running, the mixer uses it)

and that’s it. For KP3, I connected the Audiophile RCA outputs to KP3 Line In stereo inputs and vice versa with the two audio cables:

After switching all devices on I installed the Audiophile drivers. From Windows Control panel I checked that my mixer was still the default audio device, but that Audiophile was also up and ready.


CASE CUBASE

1. I launched Cubase and opened Device Setup menu. I then opened the ASIO4All Control Panel menu in the left column:

asio_menu

2. I clicked on the wrench icon to access advanced options (this lets you use more than one device within ASIO4All). My master mixer I/O pair (USB Audio CODEC) was already activated so I activated the M-Audio Audiophile I/O 1/2 pair above it.

asio

3. From Cubase’s Devices -> VST Connections menu I created a new pair of input and output buses. Here master/mixer bus is called STEREO IN/STEREO OUT and the new external FX bus using the Audiophile interface is FX IN/OUT. Note that both pairs use the same ASIO4ALL as audio device:

buses

4. I created a new stereo audio track with STEREO IN as input and FX OUT as output. This will route the track audio from Cubase/master mixer to Audiophile/KP3:

track_one

5. For demo’s sake I added a wav drum loop on that track (any audio is good, it’s for testing).

audio_loop

6. I created another stereo audio track, but with FX IN input and STEREO OUT output. This track receives the loop with KP3 FX from Audiophile and brings it back to Cubase:

second_audio

7. I set up an effect in KP3. Whatever effect pedal or such you may have, just enable it. I then clicked on the small speaker icon on my second audio track (this enables the audio playback in Cubase).

speaker

And that was it. I could now use KP3 as a track FX on an audio track. I then went on to use a VST synth with the same FX.

8. I created a new empty project and loaded a vst synth (here it is Absynth, but it can be any vst instrument) as a rack instrument from Devices -> VST Instruments menu. This automatically creates the necessary audio and MIDI tracks. From the Absynth audio track in the middle I selected FX OUT as output:

abs

9. I added a new audio track with FX IN input and STEREO OUT output and clicked on the speaker icon. The new track now got its audio from Absynth, but the FX came from KP3.

abs_two

I then moved on to Ableton to try the same.


CASE: ABLETON

Before start it is good to notice two things that to my knowledge happen by default. The first one is that ASIO4ALL lists audio interfaces in a certain way, and the order of that list cannot be changed. Here for example my master/mixer is listed below the added FX interface:

asio
The second thing to notice is that Ableton automatically (as far as I know) takes the first interface available and makes it its master input (1/2). As a workaround I changed the master output pair in Ableton. Thus in the following tutorial my master/mixer IN/OUT is called 3/4 STEREO, and the Audiophile FX interface is FX 1/2.

1. I created an audio track with Audio From 3/4 STEREO and Audio To 1/2 FX. This sends the audio on track to KP3:

track_one
2. I then created a second audio track with Audio From FX 1/2, set monitor to In, set track_two
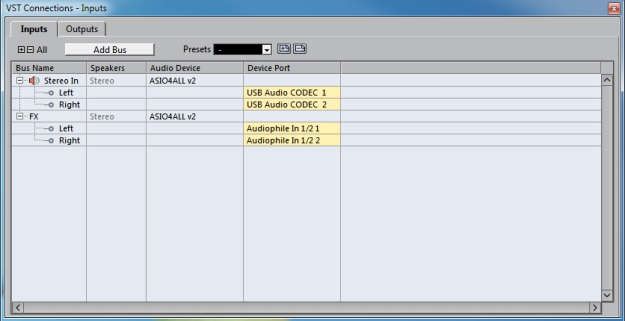
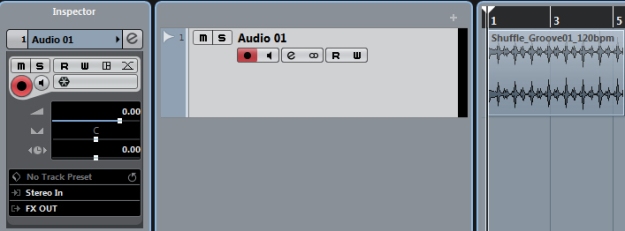
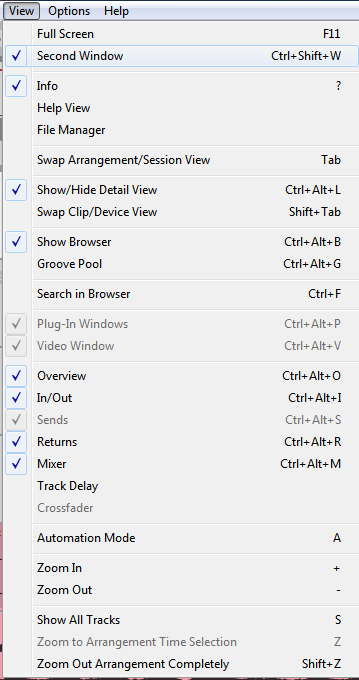
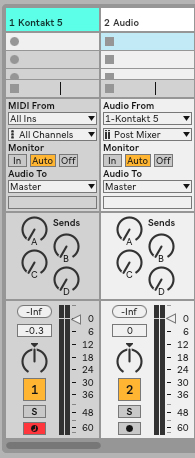
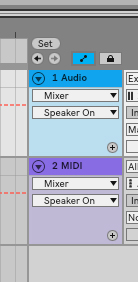
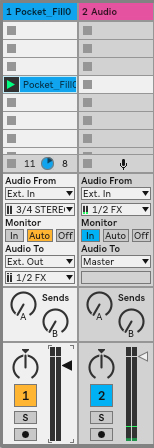
Audio To to Master and put an audio clip on the first track. Adding the audio, as far as I know, should take place in Session view, as in the image on the right. That way you will have the clip playing with hardware FX, and by enabling Record Arm, you will be able to record the audio clip with external FX.

vst

3. To use vst synths with external FX, first create a MIDI track and insert your preferred instrument.

Set Audio To to 1/2 FX (your FX interface pair). Then create a new audio track with Audio From FX 1/2 (there’s a mistake in the image, there’s only the Left channel 1 active) and Audio To Master and set the track’s Monitor to In. The audio track now has the vst instrument signal combined with your external FX.

I also tried applying similar FX process to some of my hardware synths so that the synths were connected to my mixer and the FX came from Audiophile interface. I could also record that signal in both DAWs.

As conclusion, not having multiple inputs and outputs in an interface does not stop you from using outboard FX if you have another audio interface with an extra pair of inputs and outputs. I didn’t know this before I actually tried it, but hopefully this will be of help to someone and thus expand one’s production environment. 


From Cubase to Ableton Live (part 2)

To sum up my previous post, I have now been using Ableton Live 10 for one week after ab_master
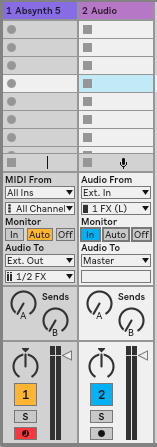
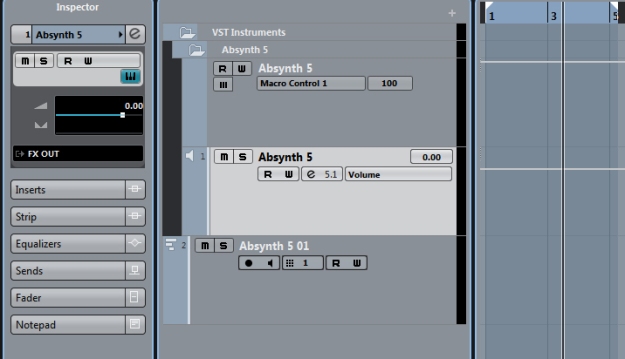
using Cubase 5 for seven years or so. This posts lists some of the issues I faced in this process. First there is the description of the issue in a form of a quote after which there is a solution with a screen shot. Both the issues and solutions have no relevance for experienced Ableton users, so go on reading only if you are either planning on trying Ableton Live or have just started like me.

  1. “This looks like a loop player only. How do I get to make arrangements in Ableton Live?”

Ableton Live has two separate default views. The Session view – which you see when you first open Live – is the “loop player”, ideal for electronic productions and generally trying things out. The Arrangement view is a window of its own.

The two circle-shaped icons on the right side of Master track select either the Session view or the Arrangement view.


2. “The Session view looks pretty good for routing and mixing. I have two or more external monitors and want to use both views at the same time.”

You can select both windows from the top menu. First select View and the activate the Second Window (second selection from the top):

ab_2win


3. “Isn’t there a click or a metronome in Ableton Live?”

In the top control bar there is an icon with a circle and a black dot. Clicking it activates the metronome, and right-clicking shows you the advanced options:

ab_metronome


4. “The click volume breaks my ears. Why there is no volume control for it?”ab_master

The click volume is located at the bottom of the master track, the one with a small icon of headphones.


5. The mixer does not have a numerical value for the channel volume. What’s with that?”

They gray line above the mixer section can be adjusted with a mouse. If it is moved upwards – as in the image – the mixer section will show the volumes of all channels in numerical values.


6. “How do I print an audio track of my MIDI data?”

ab_record

In this example there are MIDI data on track where NI Kontakt is active with a VST instrument. Next to it is an audio track, which has Kontakt 5 selected as its audio input. To get it to record, one has to arm the channel record by clicking the gray dot at the bottom, and preferably deactivating the Kontakt channel record arm. After that, when the Record icon on the top control menu (where also the Play button is) is selected, whatever is on that Kontakt track will be recorded on the audio track.

7. “I did that and it worked, but the Kontakt track lost all MIDI and audio. Now I have to reload it!?”

For reasons I don’t know, you can do the record process only once when the Kontakt – or any MIDI vst instrument – monitor selection is set on Auto, as in the image. To record further tracks, switch the selection to In whenever you want to hear what you play in Kontakt. The same solution often works if you don’t hear any audio. Just check the routing chain of your project starting from end: is the Master track monitor actually set to In? If it is, check the busses etc.


8. “I want to use buss tracks but there aren’t any.”

In Windows, press CTRL (I believe OS users have the Command key instead) and select the tracks you want to be in the same group. Right-click the tracks and select Group. After that you can rename the Group track, and as you see, the grouped tracks are automatically assigned to the correct Audio To selection:

ab_group


9. “The plug-ins disappear whenever I switch between tracks. I want to see my master track meter all the time!”

In the Preferences menu, deactivate the Auto-Hide Plug-In Windows (the second option from the bottom):

ab_plugin


10. “Ok, I got my basic mix but there are no send FX channels.”

The send FX channels in Ableton are called Return tracks, and they are located on the left of the Master channel. If there aren’t any, just add one from the same top menu audio and MIDI tracks are created. The Send levels in different audio and MIDI tracks refer to the respected Return/FX tracks and can be automated (arm channel record, press Record on top and adjust the parameters to your liking).


11. “I recorded an audio track or clip. How do I add automation to it?”autom_one

This one really gave me the kicks, especially after learning the answer. We are now talking about the Arrangement view (the process is different in Session view) and an already recorded audio clip. You want for example to enhance it by moving the volume slider or turning some knob in your reverb plugin.

To make the automation visible in Arrangement view, make sure that the automation icon on the right is blue (active). From the Arrangement view,  click on the track you want to add automation to. Then – and here is the fun part – click on the top bar Record button, but DON’T activate the chosen track record arm button. I mean to record something on a track don’t record arm it? Anyways, that is how it’s done.


12.  “My sample locations in the browser are in reverse alphabetic order.”alpha

I really don’t know how I managed to do this but it happened. Luckily the solution is simple. The image on the right shows a small gray triangle on the right. By clicking it, the folder names on the left switch either to alphabetic or reverse alphabetic order.


13.” I rendered my mix, but the volume is really low.”master_volume

To this one I don’t really have an explanation, so I just describe what I did. According to level meter plugin on master track my mix peaked in about -6db where I wanted it to peak. I then exported the audio file and listened to it. I heard almost nothing. I opened the wav file in Cubase and saw that it actually peaked somewhere below -20db. I don’t know how this happened, no track volume slider or plugin was to blame.

My workaround solution was to insert a limiter in Live’s master track and use it to raise the overall volume. This was the only that way I got the export file with preferred volume level. As mentioned, I really don’t know what happened so I’ll just leave it to that.


From Cubase to Ableton Live (part 1)

Recently I made the switch from Cubase to Ableton Live when it comes to workstation DAW. I have only started to use Ableton so I thought it would be useful to write a word or two about the transformation. This first piece takes a more general approach with the differences, pros and cons, whereas part 2 includes screenshots etc. about different issues I have encountered. For someone planning a similar switch, this will hopefully save some RTFM time (I have also read the Ableton manual, it is actually very comprehensive, being some 700 pages or so).

My primary motive for the switch was that my trusty old Cubase 5 was a 32-bit DAW whereas Ableton Live 10 runs on my 64-bit Windows 7. Some of my Cubase projects were affected by the 4GB memory use limitation so I thought a 64-bit DAW could come of use.

I also wanted to see if a new production environment would somehow affect the way I do things, and therefore prevent churning out more of the same old stuff. After all, my first DAW I used was Sony’s ACID, and learning the Cubase environment did change a lot of things too.

It is also notable that the later Cubase versions probably include a lot of things that are also included in Ableton. Thus this is not a “which one is better” kind of comparison but, rather, a report on the actual process of finding one’s way around a DAW completely new to me.

First I noticed that Steinberg Cubase has an excellent integration with different hardware. I use M-Audio Axiom master keyboard with Nektar Panorama P1 MIDI controller, and both of these have deep integration with Cubase. For example, the sliders can be used extensively with all tracks by switching the set of tracks the sliders inhabit.

There is some sort of disagreement with Ableton and Nektar, which results as Panorama being acknowledged in Live only as a generic MIDI controller. So it is first the eight tracks only that can be controlled with sliders, and the same goes to M-Audio’s Axiom (later models may have a better support). As for Play and Record buttons, they work normally, but the deep integration I enjoyed very much is now gone.

This leads to another observation: Ableton Live is meant to be used with keyboard, and I mean the one I type this with. There are a lot of shortcut commands that improve the work flow drastically, but at least I have my master keyboard between myself and my studio laptop. I know a lot of people don’t so that is enough of that. Let’s just say that if Nektar and Ableton would make a truce and integrate Live with Panorama, I would be a happy person. Also, I now fully understand why Deadmau5 – a prominent Ableton Live user – does not even bother having a master keyboard at all in this studio: he just basically types the music in.

My next observation was that there are two working environments, totally different from each other, in Ableton Live. The Session view is meant for trying things out, throwing samples, loops and clips together. I am mainly a producer of more orchestrated stuff, so I chose to use the Arrangement view, which has many of the characteristics of the Cubase main view.

However, Ableton does enable a two-window solution, which I have found very useful. In practice this means that I handle audio routing and preliminary mixing in the Session view and reserve the Arrangement window for recording.

Here I noticed a major advantage in Ableton Live – the audio routing is nothing short of excellent. In fact Live enables so much that I one hundred percent did not how to use it in the beginning (specific beginner’s issues and solutions can be found in Part 2 of this text).

My basic routine in Live is following. I record a MIDI track for example by using a NI Kontakt virtual instruments. When the MIDI data is ok, I make a new audio track and set Kontakt as its input. I then press record again and that’s it for printing a single virtual instrument track.

In Cubase I used Group tracks to create instrument bus tracks (for example all drums on one Group track etc.). Similar grouping in Live is possible by selecting two or more tracks and simply grouping them. When it comes to creating new clips with this method by saving these groups, or creating for example new instruments in Live, I will not go there in this post: I am simply yet to do any of that stuff since I don’t primarily do electronic music.

Concluding this introductory part, Ableton Live is a joy to launch when compared to Cubase. There is no extensive plug-in scan in the beginning, partly because the 32-bit plugins are now gone, but overall Live launches much faster than Cubase. Also, so far I am yet to crash Live, something that happened from time to time with Cubase.

In a sentence, there are tons of things in Ableton Live I haven’t even tried, but this was the case with Cubase too. My use of a DAW is more about it being the tool or the canvas rather than an instrument of its own. Ableton Live is clearly aimed at fast-paced production with countless keyboard shortcuts, but there is nothing in Live that would make it unsuitable for someone writing for example orchestral scores. It took me about an hour to set up a template for this, and because of more flexible routing I have found using it easier than in Cubase.

The reason why I am still so slow in Live is because I have had to learn things on the go with the interface and controls. I will compile some of these issues, solutions included, in Part 2 of this text.


When iPad met Cubase 5

For a long time I had a dream that I could somehow use the music software on my iPad – for example synths like Propellerhead Thor, Animoog or Korg iMS-20 – in my Cubase 5 productions. Now I can, and I have iConnectivity iConnectMIDI 2+ to thank for this.

The device, further to be called as iCM2+, enables users to send MIDI in, out and through, and the latter is the reason why it can return audio in sync with MIDI from iPad into DAW. I am also now an owner of iCM2+ so everything I write is based on what I have actually done with it.

In my opinion both software and hardware often make the cardinal mistake that they do not focus on making comprehensive manuals and tutorial videos. The videos can also be focused on wrong things, since if I am an existing or future customer, I need at some point to find out how the product is actually installed in my specific system.

When manuals are concerned, the iCM2+ was no exception. I believe there was a line or two I could actually use as guideline in actually setting things up. The installation itself was no problem, since as promised, iCM2+ is a plug’n play device. But sometimes there just is no sound coming out no matter what, and usually I have no clue why.

After an hour or so and about a dozen different internet sources I started to get the hang of it. Because iCM2+ works together with the primary audio interface, two separate audio input busses in Cubase 5 were needed. Also the first time ever the DAW metronome click sound simply disappeared, which was confusing since I use it in testing audio levels before turning any mixer knobs further up. The solution: enable click sound in the new buss in Cubase 5, for some reason this is not the default setting. There was also this rhythmic glitch coming seemingly from nowhere in the output channel, which was removed only after I had upgraded my ASIO4All driver to its latest version.

The iCM2+ has standard MIDI connections in its back panel so I connected my master keyboard and opened an iPad synth after I had first created an audio track with the new iCM2+ buss as input source. And the light came, or more accurately sound. Suddenly all my iPad synths were available in Cubase, and it felt really good.

This morning I had already created a demo setting where Sugar Bytes Thesys – an iPad MIDI step sequencer – controlled both Propellerhead Thor and a vst synth open in my DAW simultaneously, and the sound from these two sources was in perfect sync. I just sat and listened to the output channel for minutes, occasionally adjusting the sound a bit. Also, both instruments could be recorded in their respective tracks for further mixing.

It is not often that a device actually makes your dream come true, although in marketing this is quite common a promise. In case of iCM2+ it took some time and effort, but the result was nothing less than the realization of something I had been dreaming of ever since I bought my first iPad synth.  

The Modular Way

Yesterday the Apple Developers’ meeting gave participants first taste of iOS 9, and there in the fine print was also a mention of a new audio feature. It seems that iOS will in the near future include plugin technology, which would mean apps like Cubasis could have similar addons as in their workstation form: instruments, effects etc.

This would of course mean the end of the road for Audiobus, so far the best option for linking apps. Also the new multitasking feature will affect this, but it remains to be seen when and how. I’m sure Audiobus will in practise hang around for quite a while until the app vendors omit the new approach, if it actually is a practical one. If only Apple did something to the physical audio connections also, then the iPad would really start to challenge the workstation environment.

Meanwhile I have searched for ways to combine these two. A year ago or so I browsed through the iConnectivity catalog and found their hardware somewhat pricey. However now there is a model, the iConnectivity 2+, with the price tag of 80 euros or so, and I have actually ordered myself one. I am not in possession of it yet so I will get back to it once I have done some practical testing.

The second task, using the iPad as MIDI controller in Cubase 5 on Windows 7, has been one problem I haven’t been able to solve – until now. I found Mr Vitaliy Tarasyuk’s apps called DAW Control and Midi Studio, two reasonably priced pieces of software, which both work with Cubase 5. The only thing you need on your workstation is Tobias Erichsen’s rtpMIDI connection driver, something I have actually had installed for years. It is only now however that I found suitable apps I can use it with.

As one might suspect, DAW Control enables one to use the Cubase recording and mixing options along with the channel sliders on iPad, and I can confirm the app supports the Cubase 5 version. The real finding was the Midi Studio app, since it – although set in mixing view – gives free Midi learn option for users. Just set the sliders and knobs for Massive via Midi learn, and you can control basically every aspect of the sound like you had a hardware synth in front of you. Again, everything is fully compatible with Cubase 5.

Afterwards it basically made me angry when I thought how long it all took to be realized, and this was the main reason I wanted to share the details. I also watched Beardyman give a lecture at the TED gathering, and during the presentation he used his stage setup consisting of three iPads and synths. The outcome was a paradox, since the keynote show raised more questions than it gave answers to.

Somehow there is this veil of secrecy – even Beardyman did not give a guided tour of his setup but settled for being a sound wizard – surrounding new, easy ways of controlling sound. By this I mean the inexpensive ways, not Kontrol sellers (i.e. Native Instruments and other big players).

It’s like people are deliberately guided into buying integrated and often expensive software-hardware combinations, when in fact – as presented –  an app worth couple of euros can totally transform the way a soft synth is used in production, erasing the need for expensive new gear.

Is it really so that the controllers of the controllers  – the big makers of hardware – want to keep the easy solutions out of the market and replace this potential flexibility with their view of what is Komplete? 

I would rather take the modular way, where I am in charge of the particular pieces constructing the whole package. The only thing I need is some sort of compatibility, rather the kind that does not take two years to sort out. It seems that all sorts of things can be done with little or no extra cost, but very few people talk about this in public and I have no idea why.        

Seven Black Fridays

I noticed that quite a few Black Friday discounts on music software, hardware and virtual instruments were extended and are in fact still on. Here’s my thoughts on why this is the case.

It is obvious that the customers were stingy when it came to spending money. The lagging economy around the world is of course in the background, but then again music people are enthusiasts who rather spend a weekend eating noodles than refusing to buy something they really want.

So here’s my argument: the companies are right now out of touch with the customers. Native Instruments is currently trying to push its Maschine series forward with seven free soundpacks, but why upgrade, when even the latest software works in my Maschine Mikro, first introduced I believe four or five years ago. Were the new Maschine a self-sufficient wireless gadget I would already own it. And have you ever seen a video where people do something else on Maschine than boring 4/4 stock beat? Neither have I.

Second, the construction kit-based sample libraries are pretty much the thing a hobbyist is least interested in. For example, I enjoy turning the virtual knobs on my iPad using the Korg iMS-20 more than any VST synth on my workstation.

So how about a stress-free solution enabling to use those synths and sounds directly on my DAW? Doesn’t exist. Of course I understand that MIDI data and sound data don’t go hand in hand but yet I would think there were some kind of easy solution around. For the record, I have connected my iPad to my DAW and used app synths, and I won’t go through that mess again.

So yeah, there are things I am more than willing to pay for. If only someone was willing to manufacture them.

Laptops vs. Tablets

A recent study I came about suggested that in the last two years or so desktops and laptops have lost significant ground to tablets when it comes to everyday use. So what does this mean regarding to music-making?

A lot depends on how mobile music-making tools develop in the near future. Apple’s inter-app-audio (IAA) is one major step toward a more integrated system in making music by using several apps simultaneously. Were there a VST instruments and FX standard for iOS at some point, the scales would keep turning even faster.

One important viewpoint is the supply and quality of apps. The ‘deep sample it to death’-strategy familiar from workstation libraries won’t work in tablet environment because of the limited storage space.

So instead of sample playback software, the app world users favor physical modeling software, since it requires less resources. There are only so many 500 Mb sample-based instruments that can be installed on a tablet without jamming it completely.

Some major library players like 8DIO and Sonokinetic have recently indicated that they have interest in dwelling deeper into the world of tablets. This is interesting since both of them have so far relied heavily on mainly large, deep-sampled libraries.

Making ‘light’ versions of those libraries for tablet use would probably not lead to success. Instead the interface and overall playability should step forward in the production process. Just think for example about ThumbJam, one of the first iOS apps in music making, which is still very much relevant because of its flexibility.

As a bonus, it would really interesting if there were iCloud or iTunes specifically for sample content. Nowadays sample libraries are sold in chunks, but as in the case of iTunes, people prefer buying specific files instead of ready-made packs.

Thus instead of IK Multimedia SampleTank for iOS there would be a light player software with an ’empty tank’, however with the possibility for buying individualized in-app sample content. In a way the Alchemy iOS version has done that already, but still the content in it is sold in prepacked form instead of individual sample files.

Ultimately the desktop/laptop world and tablet environment are probably set to merge also in music production. There are relatively big bucks in the game so it is nice to see which competitors play their hand most wisely.

TouchOSC: the unknown standard

When combining tablets and music workstations are in question, the TouchOSC app is probably the most handy app I have tried. This does not mean that it was especially handy though.

In fact getting TouchOSC to work in a DAW does require quite a lot of effort, after which there are still steps to be taken with controlling different VSTs.

My point is that tablets are meant to make thing more flexible and in general easier when it comes to workflow. Somehow the software industry has missed this when developing inter-app solutions as well as workstation integration. The tools are basically there, but they are not applied effectively and creatively.

I first tried TouchOSC maybe a year ago. Today nothing much has happened regarding to its further development. It could be the standard of workstation integration, but now it is still mostly a solution for enthusiasts who prefer building their own templates.

Plugin within plugin: case Softube

The current trend of software vendors turning into hardware makers is an interesting phenomenon. So are some of the new products they come up with.

It was not long ago when Plugin Baby was the name of the love child for most of the music producers around. It’s when they turned from instruments to programming, as one LA producer once described his local working scenario in the beginning of the century.

After that a lot has happened. Hipsters brought back the banjo and other acoustic instruments along with vinyl records and even c-cassettes. Thus it may not be that surprising that also VST vendors seek new markets outside the ‘greatest plugin synth ever’ scheme.

Following the latest trend, Console 1 adds both hardware and software to your home studio.

Following the latest trend, Console 1 adds both hardware and software to your home studio.

This setting could be best described as plugins within plugins. For example, the Swedish mixing software vendor Softube recently announced their launch of Console 1, an integrated hardware/software solution, which basically replaces the mouse-mixing with knobs. A number of questions concerning Console 1 are answered here, so I’ll just insert the image I respectfully downloaded from their site for presentation purposes.

This mix of hardware and software is of course a good example of a larger trend I described earlier: those knobs do remind me of an analog mixing console. Then again, Console 1 is a controller compatible with major DAWs (Digital Audio Workstation), enabling people to use digital plugins, although renditions and models would be based on so-called vintage consoles. Hence the reference to plugins within plugin.

Then again, the Korg analog synth renditions on iPad have proven that these two worlds are today interconnected and work well together if things are done right: people like vintage even more if it comes with the processor power of the twenty-first century.

One thing I noticed concerning Console 1 was the incompatibility of the controller with third-party plugins. This is a limitation for example NI Maschine does not have, and since people choose their favorite software plugins regardless of hardware vendors, it seems risky to me to have these sort of limiting factors. After all the transformation from hardware to software in mixing was originally caused by increased mobility as well as flexibility.

The ground rule here should be the same as in keyboard controllers: they all play the sound no matter who made it. There is an obvious need for DirectLink/Audiobus sort of general standard for mixing plugins and the respected hardware, and this need will only emphasize itself if and when new hardware mixing consoles keep popping up.

One other important factor is the tablet compatibility. DAWs like Cubasis are rapidly turning iPads into portable mixing consoles so it remains to be seen if one day there will be Console 1 (or maybe 2) with (even wireless) iPad connection.

So are the knobs back for good? In most cases they were never there in the first place: products like Console 1 are aimed at mouse-mixers with wrist pains (I know what I’m talking about here). The idea of bringing in more plugin hardware along with software ultimately faces the question of necessary empty space on my table. And the more universal the controller, the less space is eventually needed.

A vendor-specific controller sounds major trouble to me. Personally I like for example using the Izotope Ozone in mastering, and it is true that Waves is a major player in mixing plugin markets. Would Waves or Izotope – or the good old Softube business pal Native Instruments – at some point release mixing console hardware with Softube plugin compatibility, I believe my choice would be an easy one.

This does not mean that Console 1 would be of faulty design. I just hope the plugin integration will eventually span outside the borders of their own products. It helps when people think about including Console 1 as a part of their gear arsenal. Also the Console 1 price should from my perspective be closer to NI Maschine Mikro or IK iRig Keys than any of the Softube software plugins: for me as a hobbyist 200 euros would the maximum for this concept. There’s one thing vendors often miss regarding to this. Pros already own or have access to quality mixing hardware so they are not the Console 1 target group, but the hobbyists have limited financial resources.

And after all the less people you exclude, the more you will in the end include.